Evening Readers,
This Blog post is somewhat of a continuation for my previous one about web server testing. This blog will cover how to create a web specific user that doesn’t use a badge. You can do this at any time in the process. A web user is not required to complete the previous blog, but if you have a high volume and high user count, this might help out. Before we start, make sure you have an X3 user that is part of the super administrator group so that you do not have issues creating user, groups, roles, etc…
Our first stop is Roles. You can find this under Administration, Administration, Users.

From the Roles function we are going to create a new role. On the creation screen, its important to create names / descriptions that are meaningful so that it’s easier to remember why they exists. For me I am using WEBSERV for the name and I will continue to do so to make matching easier through the process. You only need to fill out the required fields which are Code, Description, and Security Profile. I use the Administrator profile for the Security Profile.

Go ahead and click save and close out of the function. Next, we are going to go to the Groups function. You can find this right above the Roles function under Administration, Administration, Users.

Here we are going to create a new group. The group we will tie back to the role. We will only fill out the Description, Role, and Endpoints. Note that if you are going to do this for multiple endpoints you would do this process for each endpoint.
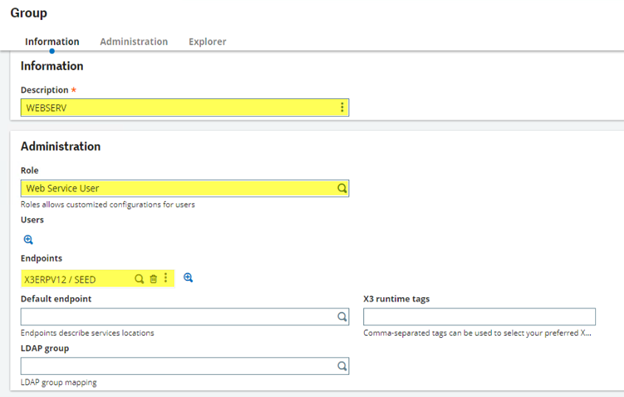
Click save to save your filled out information and then exit the function back to main screen. The next function is the User function. This is where we create the user. You will want to head to the same place that we went for Groups and Roles.

You might have a lot of users here in the User function so make sure you label your Web user with a name you can easily find. Go ahead and click “New user” to create a new user. Some key things to remember here; the user has to be set to standard authentication w/password and password never expires. The other fields you have to fill in are Login, Last name, and group. For the group, select the group we made on the previous screen.
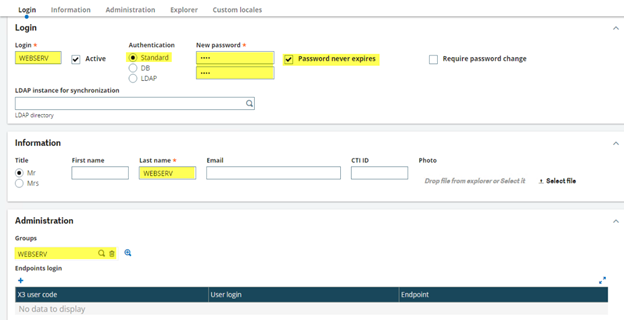
once you have all the proper information set, click save and save the information. Head back to the main page.
Our last stop before adding the user to the pool is to create a classic user. The classic user is what allows the web pool to functions, like sales order. To get there, you want to navigate to Setup, User, User.

Make sure your logged into the same endpoint you listed on the Group. After the User function loads, locate the ADMIN user code. We are going to copy the ADMIN user because we want to have web services not restricted by function. If you would like to create a specific user code with specific rights, you may do so, but I am not going to go into detail on user creation and security / restrictions.
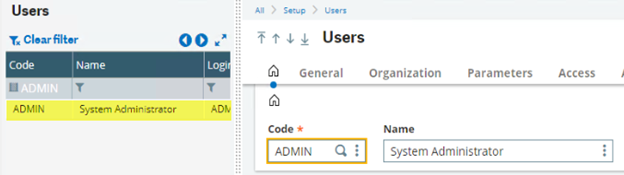
Here we are going to load the admin user, click into the Code field and delete the code name ADMIN. You want to replace with something you can easily find later. You may also want to update the name.
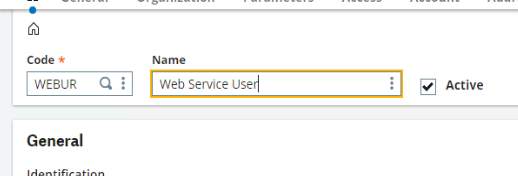
Next you want to go about halfway down the page to the Login field. In the login field I should say ADMIN also. We are going to change this to the Administration User name we created earlier for web services. I called mine WEBSERV so I would put that there.

once you changed the Code, Name, and Login to match you new web user, click save. You should be prompted with a Duplication popup. Click yes to this popup.

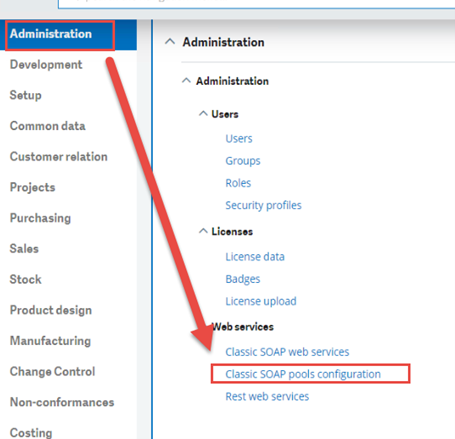
And that’s it. The user setup is done. The last thing we have left to do is to stop the existing pool and assign the new user to it. If you don’t know about the Web services configuration, see my previous blog on how to setup and test Web services (HERE). The configuration for the pools is under Administration, Web services, Classic SOAP pools configuration.
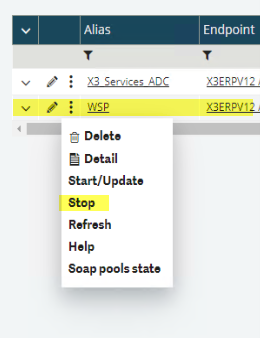
Here you would locate your pool you wanted to change out and stop the pool. You can do this by either editing a pool or clicking the three dots next to the row to get the stop option.
OR

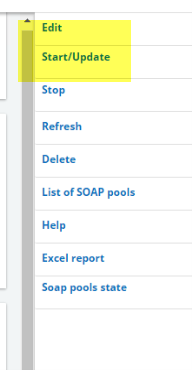
After the pools stop, click edit and edit the one pool you want to change.

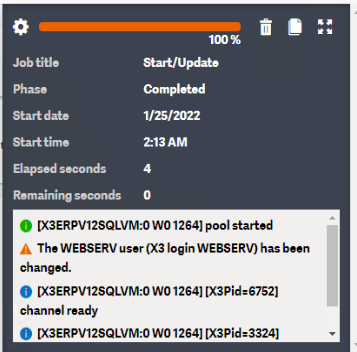
Then click save and start/update. If everything went according to plan, the pool should start without any errors.
You can see in my start/update log that it notes the change (user) and updates the channels.
Now that the user is done and added to the pool, you can test out. Check out my earlier blog on setting up web services and testing web services to see how you can easily test web pools (HERE).
Until next time…