

When a user is working with a workflow and is escalating from one state to another there are times when the CRM will be interrupted and the workflow rules for a state will not be completed leaving the workflow in a semi-processed state. This can happen when the user logs out of the CRM before an action has completed.
There are ways to ensure that if all workflow rules are not completed then the workflow can be put back into its previous state.
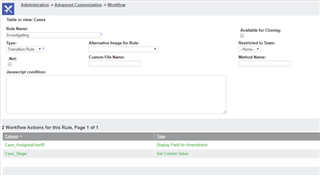
For the following example I will be using the Case Workflow.
Administration -> Advanced Customisation -> Workflow -> CaseWorkflow

Using the Workflow Rule: Investigating
The user can select the button ‘New’ at the bottom of this page and add in a workflow follow-up action:

These action types have a label associated that will be saved in the WorkFlowHistory table in the column WkHi_Name when the task is added.

We can then add a script that will ensure that if the user does not add a task as part of the escalation from the ‘Queued’ state to the ‘Investigation’ state then the workflow can implement other actions implemented in the script.
Now with the Follow-up task added:
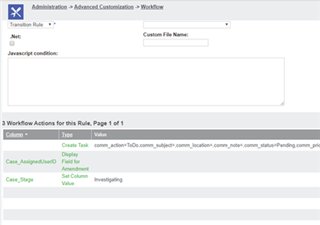
We can now add a script to check if this label has been added when a user transitions to the Investigation state.
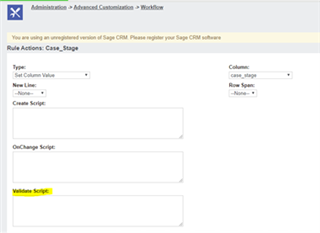
For this we can use the Validtion Script field which are available in the rule types: Set Column Value, Reset Column Value and Display Field for Amendment. For this I used the ‘Set Column Value’ for the Case_Stage field.
We can then add this script to set the workflow back to its initial state:
if (CRM.GetContextInfo("cases","case_caseid"))
{
var caseid = CRM.GetContextInfo("Case","case_caseId");
var WorflowId = CRM.GetContextInfo("Case","case_WorkflowId");
var wkflhi_name = "null";
var Query;
var sql = "select * from WorkFlowHistory where WkHi_InstanceId = " + WorflowId + " and WkHi_RecordId != " + caseid;
Query = CRM.CreateQueryObj(sql);
Query.SelectSql();
while(!Query.eof)
{
wkflhi_name = Query.FieldValue("WkHi_Name")
Query.NextRecord();
}
if(wkflhi_name != "TestLabel")
{
var intRecordId = CRM.GetContextInfo("case","case_caseid");
var myRecord = CRM.FindRecord("case","case_caseid="+intRecordId);
myRecord.case_workflowid = null;
myRecord.SaveChanges();
}
}
This script will first find the case id and workflow id of the case being processed:
var caseid = CRM.GetContextInfo("Case","case_caseId");
var WorflowId = CRM.GetContextInfo("Case","case_WorkflowId");
It will then use this data to to find the Task Label in the WorkHistory table by querying the database:
"select * from WorkFlowHistory where WkHi_InstanceId = " + WorflowId + " and WkHi_RecordId != " + caseid;
The task label will be what was defined when the follow-up task was created. For this example it is "TestLabel".
The script then checks if the Task Label that was retrieved does not match “TestLabel”. If it doesn’t then the Task was not created. It will then find the record for the case in question:
var intRecordId = CRM.GetContextInfo("case","case_caseid");
var myRecord = CRM.FindRecord("case","case_caseid="+intRecordId);
And set the Cases workflow Id to null and save this change:
myRecord.case_workflowid = null;
myRecord.SaveChanges();
This will set the Case back to the initial state.
This can now be tested:
Create a simple case:
Put in the ‘Queued’ state and then select the ‘Investaging’ action.
Save the initial status of the ‘Assigned to’ and ‘Stage’ and move to the next screen:
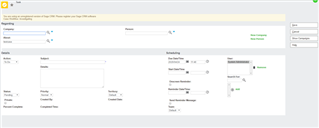
Here we have the option to create a task. If we add a Subject title and save this, the case will be put into the ‘Investigating’ state. However, If we select the ‘Cancel’ button we will be brought to the cases ‘Communication’ because it was expecting a new task to be created. Select the cases ‘Summary’ tab and we will be presented with this screen:

Here we can see a new button called ‘Accept’ over to the right where the workflow actions were initially. Click on this button and select save on the next screen and this will put the case back into the ‘Logged’ state with all the settings of the case when it was created initially.
There is another option to change the workflow state directly in the script. Instead of changing the workflow id to ‘null’ we can change the WkIn_instanceId value in the workflowinstance table to change the state its previous value by using this code snippet:
if(wkflhi_name != "TaskLabelTest")
{
var intRecordId = CRM.GetContextInfo("case","case_workflowid");
var myRecord = CRM.FindRecord("workflowinstance","WkIn_instanceId="+intRecordId);
myRecord.WkIn_CurrentStateId = 3;
myRecord.SaveChanges();
}
For this example I am changing the state back to ‘Queued’ by setting the column ‘WkIn_CurrentStateId’ to 3. Changing this 4 would put it into the ‘Waiting’ state.
This option simply changes the State of the workflow. It does not undo the changes made to the case that was implemented in the first Investigating transition. This would simply give the user the option to redo the transition by giving the option to select the ‘Investigating’ transition again.