

Sage 200 Evolution – Innervation Setup guide using Evolution Retail POS
Dear Sage City Member
This blog article will cover the basic checks, setup and references on what you will need to configure and use the Innervation EFT Pin Pad integration with Evolution Retail Point of Sale.
Integrating a Pin Pad solution to an invoicing solution is an essential part of the retail industry today. Everyday fewer individuals carry around cash, instead opting to use the safer bank card to make purchases. Equipping your business to handle payments by bank cards are essential and opens up your business to a much broader spectrum of customers.
Over and above the Sage Retail POS solution there is an integrated solution with a company called Innervation who provide the EFT Pin Pad solutions so that your customers can easily swipe their Debit or Credit cards to make purchases at your store.
Here are the high-level requirements to setup this feature.
- Sage Evolution Application with the Retail POS solution needs to be installed and setup by your Sage business partner.
- After the above install and setup, you should be able to successfully capture and process invoices through your Retail POS solution.
- Contact Innervation and signup to create a new account for you and your business.
- Innervation will Supply the Server that will be responsible for payment authorizations as well as the Pin Pad devices that you will use to service your customers.
- The server and Pin Pad devices will be setup at your premises by Innervation.
The following settings will be Done on the Evolution back office to finalize the setup.
Step 1
Setup Company Details
- Common | Maintenance |Company Details
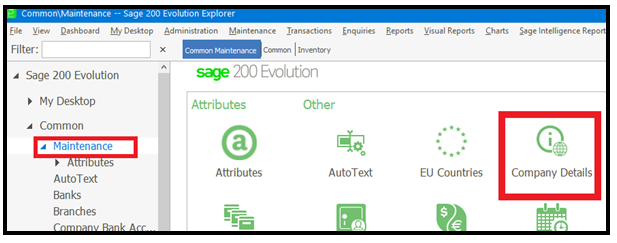
- Once Company Details are opened, select the Bank tab. The options highlighted will have to be populated based on the information supplied by Innervation.
- The Option to “Use Integrated EFT POS” must be ticked on the box.
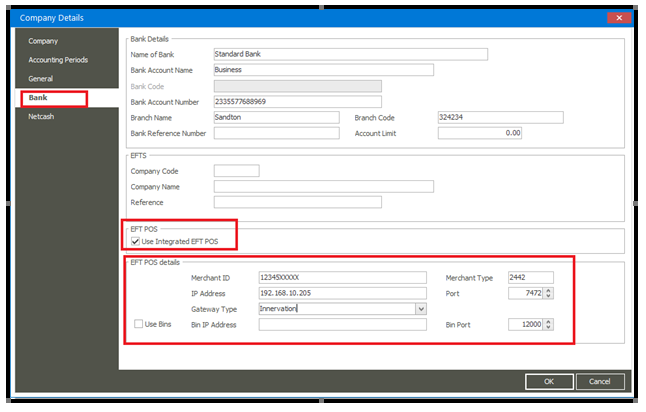
- EFT POS details will all be supplied by Innervation. The Gateway type may differ depending on the Innervation software version being used. Innervation will advise on the software version that they are using.
- Once all the settings on the Bank Tab are completed you can click on OK to save all changes and exit from this menu/option.
Step 2
Edit CARD Tender Type
You will now navigate to
- Retail Point of Sale | Maintenance | Tender Types
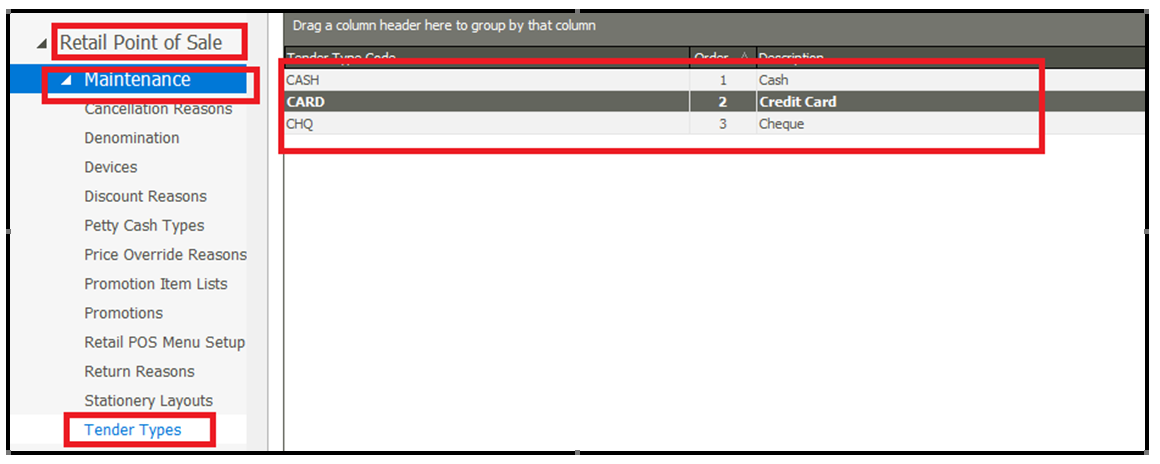
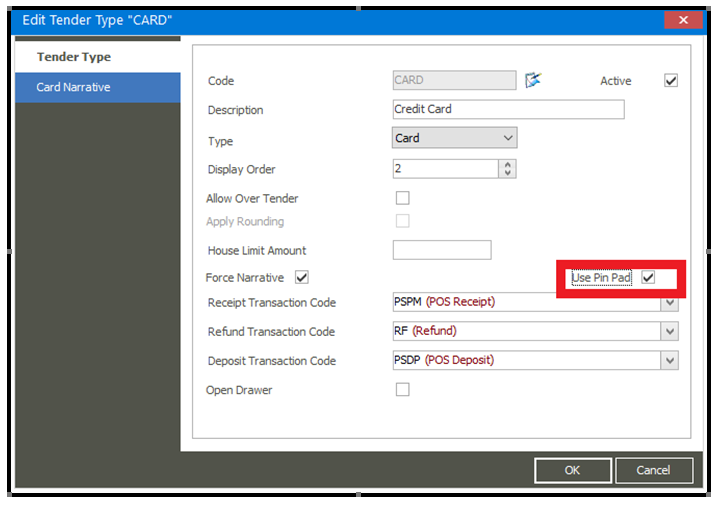
- At this point Tender Types would already be setup. Typically, the EFT integration will be setup on tender types labelled as CARD. The following options will need to be set on the CARD tender type as to invoke the commands that are ultimately sent to the Pin Pad device.
Step 3
Add a Pin Pad device
Navigate to
- Retail Point of Sale | Maintenance | Devices
- Click on the add Button and Enter in the details for the Pin Pad. The device code and description can be a code and description of your choice, however the Device type selected from the drop-down menu must be Pin Pad. The Port number will be one that Innervation has installed the device at and they can advise you of the value to enter here.
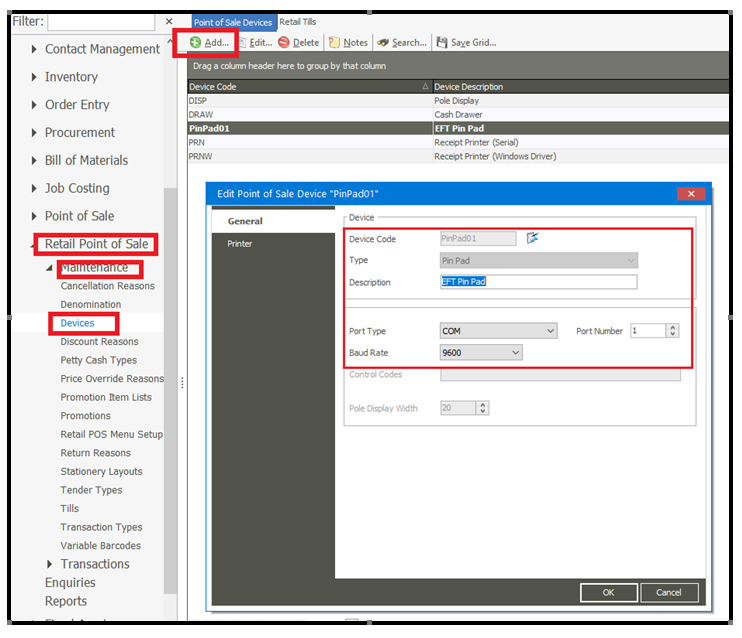
- As seen above the ‘Use Pin Pad option’ must be selected. If you are using multiple tender types that integrate with a Pin Pad then they all should have this option selected.
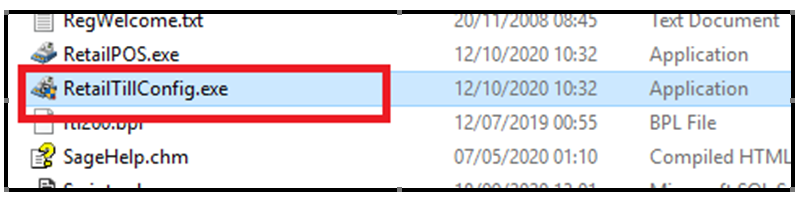
Step 4
Setup the till configuration as the final configuration step.
- Access the Till configuration EXE file from within the Sage installed directory. The default directory is as follows
- C:\Program Files (x86)\Sage Evolution
- Locate the following EXE file and open it up.
"RetailTillConfig.exe"
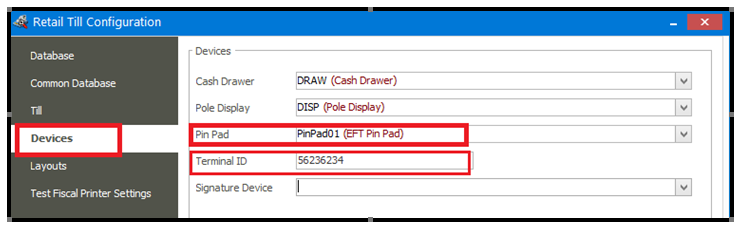
- On the following screen click on NEXT until you get to the Devices tab.
- Select the Pin Pad that you created earlier then enter the terminal ID provided to you by Innervation. If there are multiple tills being setup there will be a Terminal ID setup for each till/PC.
Final Test
Upon processing a transaction an Retail and selecting the Card tender type Retail POS will send an instruction to the Pin Pad with the final invoice amount that the customer will be paying. It will instruct you to either Insert car or Tap card and if required the customer may have to enter their pin.
This instruction now goes through to the Innervation server setup onsite. The server will accept or decline the transaction based on the bank response.
I sincerely hope this document will give an existing Retail POS user a better idea on how the Integration is setup and what it is about. For any further questions or queries please direct them to the Sage support team or contact your Sage Business Partner.