The following blog article addresses new features such as the Sync Monitor as an NT Service, XML Verification file, Corrective file, and Data Recovery. The new features were added to cater for issues such as missing IBTs, Data loss etc. in a Branch Accounting Environment.
Version 10.0 release of the Sync Monitor has had 4 main areas of development which can be broken down into the following categories.
1. XML Verification file - responsible for cleaning up of XML files after successful importing of data.
2. Sync Monitor as an NT Service
2.1 Sync Service Configurator - Responsible for specifying which Sync Monitor application to run.
2.2 Sync Monitor Service - Responsible for starting the Sync Monitor application at the predetermined interval associated with the config file for the Sync Monitor.exe.
3. Corrective file - The corrective file is intended to auto correct missing records between databases.
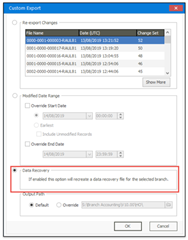
4. Data Recovery - The data recovery option is useful if a branch database is lost and needs to be restored to the latest snapshot from HO, without performing a custom export which could be a very large file taking a long time to import.
XML Verification File
The XML file verification was added in version 7.20 of the sync monitor. The purpose of the XML file verification is to ensure that the file exported is the same file being imported. The sync monitor generates a SHA1 hash for the exported file, this hash is added to the XML file which is then uploaded along with the export file. The receiving sync monitor will download the XML and import file. Before importing the file, it reads the hash within the XML file and generates its own SHA1 hash for the local copy of the downloaded file. If the two SHA1 hashes match, the sync monitor will import the file, however, if the hashes do not match, the sync monitor will write a warning entry to the log and skip the import file. This process will continue until the hashes match and the file is successfully imported.
After a successful import, the sync monitor which received the XML file and imported the data will flag the entry in the XML associated with the import file for deletion. This file is then uploaded, and downloaded by the corresponding sync monitor i.e. the owner of the XML file. The sync monitor which owns i.e. is responsible for the XML file, will then remove the successful import entries from this file, therefore, keeping the XML file small and only relevant entries should remain i.e. pending import, failed imports.
Below are some examples of the XML verification file:
XML verification file owned by the sync monitor - HO

XML verification after importing at sync monitor CPT - “0002-0000-000001-RAUL81.dat”, “0002-0000-000002-RAUL81.dat”, with the status column set to 1 i.e. completed
XML verification file owned by the sync monitor - HO after removing the completed status entries.

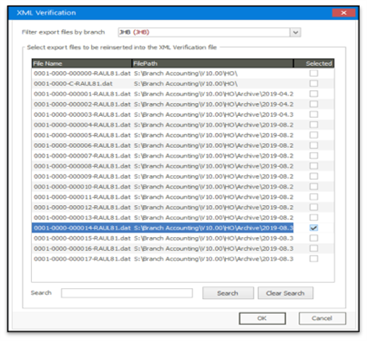
We have also added a new dialog to the sync monitor i.e. Add .dat file to the XML verification file.
This option allows the user to reinsert a .dat export file into the XML verification file. This is helpful if you receive the XML verification hash mismatch warning during an import.
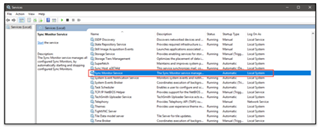
Sync Monitor as an NT Service
The Sync Configurator application will list all configuration files located in the “C:\ProgramData\Sage Evolution\Database Synchronisation\Config” folder. By default, all these found files will be displayed, as the NT service will not know which configuration files are valid.
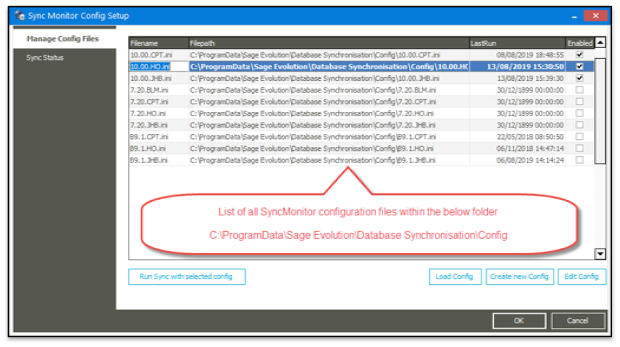
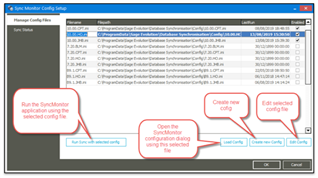
You are able to run the sync monitor application manually using the selected config file, as well as load, edit and create a new config file.
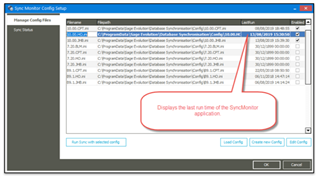
After a successful synchronization process, the LastRun time will be updated automatically regardless of which process started the sync monitor i.e. NT Service, Sync Service Configurator, desktop shortcut.
The sync service configurator also has a built-in communication layer for the sync service as well as the sync monitor. This is necessary as the service starts the sync monitor application in a virtual/hidden service desktop, so even though one can see the actual sync monitor .exe process in the task manager, you cannot physically see it running. The communication received from either the sync service or sync monitor are displayed in the sync status tab.

Data sent via the sync monitor service.exe i.e. NT service
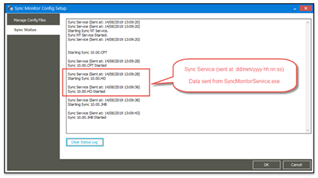
Data sent via the sync monitor.exe

The Sync Status window will only display the following information
- Status from NT Service, Starting, Stopping, Pausing etc.
- Which SyncMonitor is about to be run and running.
- Status from the SyncMonitor i.e. Start, Completed
- Some types of errors i.e. Another instance is running, the database is not the correct version etc.
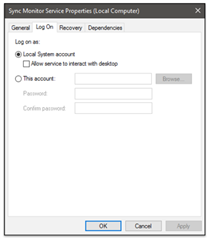
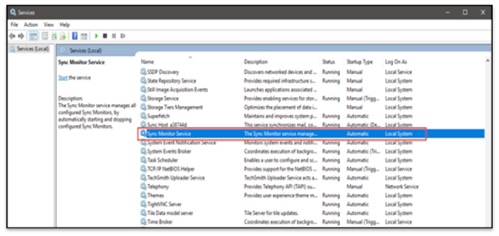
The NT Service needs to have a valid Windows account associated with it. The reason being, if the computer is rebooted due to power failure issues, the service will automatically start up and execute the individually enabled sync monitors.
This can be done by opening the Windows service, right-clicking the Sync Monitor Service, and specifying a valid Windows account on the Log On tab. Once this has been completed you will see the Log On As value change from Local System to the Account specified.

Corrective File
The corrective file is intended to auto correct missing records between databases. Currently, the following tables are set to autocorrect. However, you have the ability to add more tables on SQL such as INVNUM, _btblinvoicelines etc.
- PostAR
- PostAP
- PostGL
- PostST
- _etblWhseIBT
- _etblWhseIBTLines
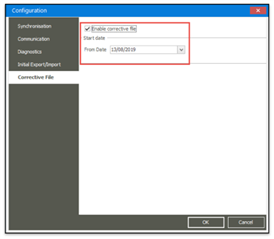
Each sync monitor must have the ability to autocorrect switched on, as by default the correct process is switched off. You can enable the corrective file process by opening the config file for each sync monitor you wish to enable. Once you have enabled the corrective file, you will need to specify the date the sync monitor must use to locate any missing records. This date equates to the TableName_dModifiedDate. The date specified on each sync monitor config MUST BE the same value, otherwise, the sync monitor will not be able to perform corrective data correctly.
Please see below screenshots highlighting this.
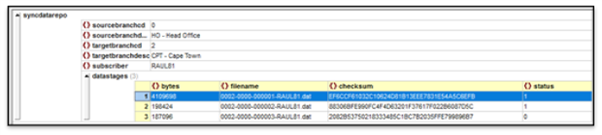
Within the master databases, two new tables have been added to help facilitate the corrective file process. These two master/details tables are:
- _etblSyncInfo (Master)
- This table stores the relevant record counts for global and branch-specific records and is only updated on a successful export and or import.
- _etblSyncInfoDetails (Detail)
- Stores the link between the _etblSyncInfo and the TableName_Checksums for the table in which the record count mismatch was located.
Once a valid export file is created, the calculated record counts within _etblSyncInfo are added to the export file. Once this file is received and imported at the HO/Branch, the SyncMonitor will calculate its current record count at its connected database, and compare its version of _etblSyncInfo against the _etblSyncInfo of the export table which is located in the staging database.
If a record mismatch is determined, the import sync monitor will store all its checksums for the table which the record count mismatch was determined into a corrective file. This corrective file will be uploaded and downloaded at the receiving sync monitor. The receiving sync monitor will use the data stored within _etblSyncInfo and _etblSyncInfoDetails to locate any records where the exported TableName_Checksums do not exist. If records are located, a custom export containing ONLY the missing records are exported to the table. This table is then imported at the other sync monitor, and once again the record counts are compared between the _etblSyncInfo contained within the custom export versus the record count at the local database _etblSyncInfo. If the records count match, then the corrective file process will not continue, until the next export/import occurs, once again starting the entire corrective file process.
Initial Syncs and Data recovery
Initial syncs and the data recovery are performed using the command line utility bcp.exe i.e. Batch copy program from Microsoft. This allows the sync monitor to create an initial export and or data recovery file quicker than in earlier version of the sync monitor i.e. 7.10 and lower.
Essentially the sync monitor scripts the HO database and extracts individual table data which is packaged into a XXXX-XXXX-00001-SUBSCRIBER.dat (Initial export file) or a XXXX-XXXX-D- SUBSCRIBER.dat (data recovery file). The data recovery option is useful if a branch database is lost and needs to be restored to the latest snapshot from HO, without performing a custom export which could be a very large file taking a long time to import.
Data recovery option