The requirement is to print the company name, address, and contact details of the party responsible for paying for duties/taxes on a delivery. This may be different than the BPC listed on the delivery record.
I am trying to add a BP number and related address field on the delivery header to allow the user to enter these details.
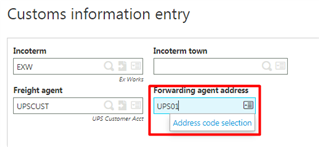
What I want is the ability to select the BP number and then define the address code related to that BP number.
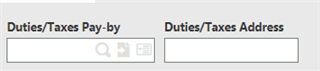
The outcome is I get a Duties/Taxes Pay-by which works correctly. But my address field acts as a text box with no ability to define the the address code. What am I doing incorrectly?

Modifications made:
- Development->Data and parameters->Tables->Tables
- Navigate to table code ‘SDELIVERY’
- Enter the following details to create ‘Duties/Taxes Pay-by’:
- Column:ZBPCDTPYR
- Type: BPR
- Activity Code: ZITM
- Dim:1
- Normal Title: Duties/Taxes Pay-by
- Abbr. Title: D/T Pay-by
- Longs Title: Duties/Taxes Pay-by
- Linked Table: BPARTNER
- Link Expression:
- Cancellation: Block
- Verification: Yes
- Mandatory: No
- RTZ: No
- Enter the following details to create ‘Address:
- Column: ZBPADTADD
- Type: ADR
- Activity Code: ZITM
- Dim: 1
- Normal Title: Duties/Taxes Address
- Abbr. Title: D/T Address
- Long Title: Duties/Taxes Address
- Linked Table: BPADDRESS
- Link Expression: 1;ZBPCDTPYR;ZBPADTADD
- Cancellation: Block
- Verification: Yes
- Mandatory: No
- RTZ: No
- Select ‘Save’ and ‘Validation’ on the right list
- Development->Script Dictionary->Screens->Screens
- Navigate to screen code ‘SDH0’
- Enter the following details to add ‘ZBPCDTPYR’ to the screen:
- Field: ZBPCDTPYR
- Block: 1
- Position: 13
- Description: Duties/Taxes Pay-by
- Col. 1
- Type: BPC
- Select ‘options’ on action button
- Put ‘Active customer’ to “yes”
- Put ‘Non-prospect custome’ to “yes”
- Select ‘OK’
- Select ‘parameters’ on action button
- Enter parameter value: 1
- Select ‘OK’
- Select ‘options’ on action button
- Input: Enter
- Act.: ZITM
- Dim.: 1
- Mandat: No
- Tunnel: Yes
- Link: Long
- Enter the following details to add ‘ZBPADTADD’ to the screen:
- Field: ZBPADTADD
- Block: 1
- Position: 13.1
- Description: Duties/Taxes Address
- Col. 1
- Type: ADR
- Input: Enter
- Act.: ZITM
- Dim.: 1
- Mandat: No
- Select ‘Save’ and ‘Validation’ on the right list
- Development->Script Dictionary->Windows
- Navigate to window ‘OSDH’
- Select ‘Validation’ on the right list
- Setup->Sales->Entry Transactions->Deliveries
- Navigate to each and every transaction selection in the left list, select ‘validation’
The best would be if can act in the same manner as the Forwarding agent address field on the right list of the customs information entry.