

Hello readers, today we are going to take a look at the short subject of Syracuse load balancing. The Syracuse Load Balancer, sometimes called Internal Load Balancer, has been a more common subject lately. I decided to write a small segment on the Load Balancer. So, the Load Balancer is an integrated piece of Syracuse. It is hard coded balancing that’s part of the node.js encoding that is used with the Syracuse design. I will save you the agony of me trying to explain the inner workings but, for those interested, we do have an online help topic on just that. If you want to learn the details of “The How”, click HERE.
For the sake of this post, all you need to know is Syracuse has its own internal load balancer and you cannot change it. It also helps with session balancing between two or more Syracuse servers. So, what’s the point to all this stuff I am talking about… Well, I am here to explain how to turn it off. Specifically, how to stop the Load Balancer from “load balancing” between other Syracuse servers. And why would you do that? That would be an excellent question. So, sometimes, IT or companies want to use their own load balancer, or they want to tie it into an existing one that is used throughout a business. This allows you do to that. Some have a lot of users, and a lot a mean like 2000+ users, this means they have 9 or more Syracuse servers. A situation like that, the internal load balancer may not be “beefy” enough to handle that much traffic and having a dedicated load balancer might work out better. There are more reasons as to why, like being on AZURE or AWS, but in this specific case, the how is the focus of the post, not the why. We can save “why” for another blog post.
Let’s get started. The first thing you will need is administrator access to the servers where each Syracuse component is installed. You will also need access to the Services for the server. Lastly you will need a text editor software. I typically use Notepad++ but you can use any text editor software that allows for admin authentication. Once you have all of these, we can begin.
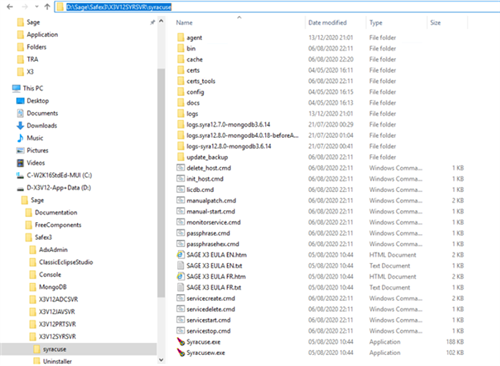
First thing we need to do is locate the Syracuse directory. Here is an example location: D:\Sage\Safex3\X3V12SYRSVR\syracuse
The directory should look very similar to mine.
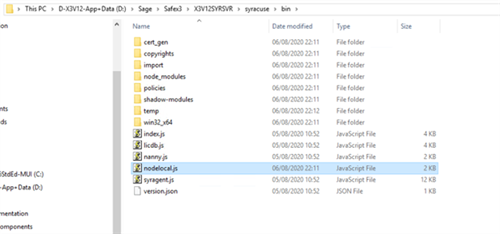
We are going to navigate to the bin folder. An example location is D:\Sage\Safex3\X3V12SYRSVR\syracuse\bin
Inside the bin folder there should be a file called nodelocal.js
This is the configuration file for the Syracuse services. This is the file we are going to open with the text editor. Before you edit this file, it is HIGHLY RECOMMENDED TO BACK UP THIS FILE. This is no joke. If this file is corrupted or your break it, the Syracuse service will not start, and no one will be able to log in and use the Sage X3 Software. I will repeat myself, BACK UP THE NODELOCAL.JS FILE!
For me, I just copy/paste a copy of the file to the same directory. I just select it, hit ctrl+c then ctrl+v and it should make a copy of it with the word Copy at the end.
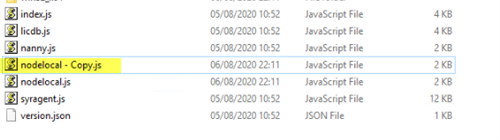
Now that you have a copy, go ahead, and open the original file in the text editor
It should look similar to mine.

Now, we are going to go to the end of the file and add some coding. The coding we are going to add will turn off load balancing and enable local balancing. What that means is that this specific Syracuse server will only balance sessions and connections within its own set of node.exe processes. It will not share connections with other Syracuse servers on the network. So, it’s like telling the Syracuse server to stay in its own corner and not talk to anyone.
To do this, we have to add the following to the bottom of the code structure
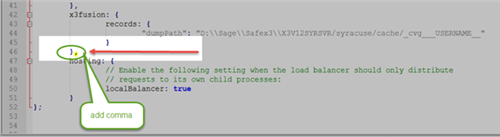
hosting: {
// Enable the following setting when the load balancer should only distribute
// requests to its own child processes:
localBalancer: true
}
Now you do not need to include the comments (designated by the //) but you can if you want. So, your current nodelocal.js file should now look like mine.
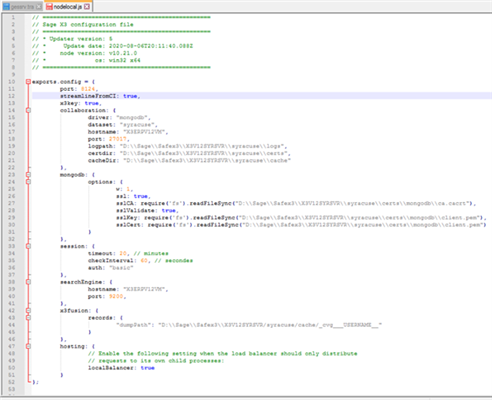
When adding the coding it is very important to pay close attention to syntax and punctuation. It is extremely sensitive to structure. A comma or bracket in the wrong place and the service will not start.
There is one extra part to look out for. When adding the extra code, you have to remember to add a comma separator to the last subsection (x3fusion) to separate the last subsection and new one we are adding. You also do not add a comma to the added new subsection.
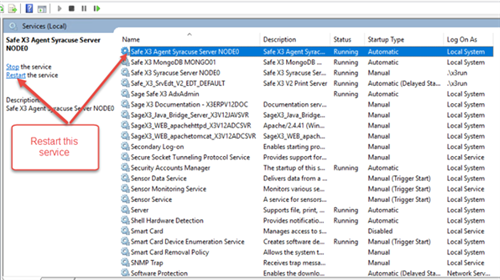
After you have everything in place, save the file. Once it's saved, all you have to do is restart the Syracuse services to make it pick up the new changes. You can get to services from either the task manager and services tab or from the control panel, administrative tools, services. When you get it open head down to the “S”s and look for Syracuse. Note, the name of the actual service will vary depending on the version of Sage X3 you have installed.
If you restart the services but you are unable to log in or you get no database connection error trying to log into Sage X3 or you are unable to start the services, then you need to go back to the nodelocal.js file and check you spelling and punctuation. Most likely something was mistyped or misplaced.
Now that its successfully restarted and you can also sign in; all you have to do is repeat the same process for each Syracuse server.
That’s pretty much it. It is pretty simple to do.
Until next time,

-

AMR70
-
Cancel
-
Vote Up
0
Vote Down
-
-
Sign in to reply
-
More
-
Cancel
Comment-

AMR70
-
Cancel
-
Vote Up
0
Vote Down
-
-
Sign in to reply
-
More
-
Cancel
Children