Surpress Blank Space when inserting images using OLE objects onto Picking Sheets

SUGGESTED

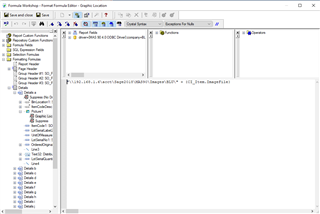
I figured out how to add images to our picking sheets, but not all items have images and those that don't leave a huge blank space where the image is supposed to be. Is there a way to "collapse" this space if there is no image associated with the product? 

I already have it set to suppress if there is no image file, using: 

formula = {CI_Item.ImageFile} = "" 

But it still leaves a big empty space. 

  • 0 in reply to ArmanXavier

    this is an example of the issue, I don't want that space in between the product on the top and the products below. I already hit "suppress blank space" in the Detail Section and it still doesn't work. Thanks! 

  • 0

    Try this formula for the suppress condition:
    IsNull({CI_Item.ImageFile})

  • 0 in reply to ixm7

    Hmmm that doesn't seem to work, it won't even suppress 
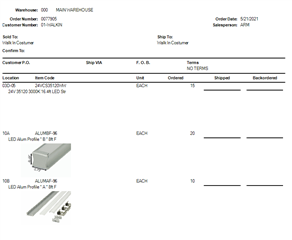
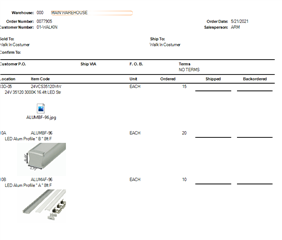
it. This is what happens when I try that 

  • 0 in reply to ArmanXavier

    Are you
    a) displaying an image stored in the database? 
    b) displaying an image stored on the hard drive (where the database only provides the path to the image)?

    If the use case is b, and the image is simply missing, you would need to detect whether the image file is missing. 
    While Crystal alone can't do that, there are 3rd-party User Function Libraries (UFLs) that allow you to use a Crystal formula to check if a file exists. See list of UFLs here

  • 0 in reply to ixm7

    It's an image stored in the database (i believe), the images are OLE object and this is how I am pulling them into the picking sheet. I am not sure why it is using that "ALUMBF-96.jpg" placeholder .jpg name. The product in question has no associated image file. I am a novice at Crystal Reports, so perhaps I'll need to hand this off to an expert.

  • 0 in reply to ArmanXavier
    SUGGESTED

    Your screenshot shows that this is scenario 'b' rather than 'a'.  
    The Crystal report is looking for the image file on your network drive.  
    So you need a FileExists() function provided by a UFL to test if the image file exists.

  • 0
    SUGGESTED

    The first of the following approaches lets Crystal Reports automatically handle letting the OLE object grow at 100% width and height scaling of the target image which allows you to resize the OLE object to a small image so it doesn't take up a lot of space in its default state.  The downside to this is you need to make sure all images being used have been resized appropriately so they don't end up taking up a lot of space in the report.  If this is an issue and you want to force scaling of all images to a specific size in the report, then you can try the second approach if you are positive that if the record has a value in the ImageFile field then it will exist, otherwise, you will need to use a third party UFL to check if the file exists. 

    Approach 1.

    Right click the image in the report, then look for "Bitmap Image Object" and expand it until you see the "Edit" and "Open" options, click either.

    If you don't see either option, you should see "Convert Picture Object", click it, then select "Bitmap Image" as the type and click OK.

    Once the image is opened in MS Paint, make sure it is a simple white square that is small yet not too small so that it would cause you to not be able to find it easily.  Resizing the whole canvas to 15 x 15 pixels usually works well.  Then close MS Paint. 

    It should look something like this.

    Right click the image and then click "Format Graphic".  Make sure "Can Grow" is checked on the Common tab.  You can also add the following to the Suppress formula.  Replace the table name appropriately.

    IsNull({CI_Item.ImageFile}) Or {CI_Item.ImageFile} = ""

    On the Picture tab, make sure that the Width and Height under the Scaling section are 100%.

    For the Graphic Location formula, you should be able to use what you posted above, however, if it will be used across multiple companies, you should create a CompanyCode formula with a default value of "".  Then use that in your image path so the company code is not hardcoded into the path. The CompanyCode formula will be populated with the company code that the report is being ran under when it is processed from within a Sage 100 task.

    Approach 2.

    Resize your OLE object using the above method so its default size at 100% scaling for width and height is the absolute maximum size you want your images to appear as.

    Move the OLE object to a new section all by itself. 

    Conditionally suppress the section using the formula shown above.

    Right click the image and then click "Format Graphic".  Make sure "Can Grow" is unchecked on the Common tab.  

    On the Picture tab, make sure that the Width and Height under the Scaling section are 100%.

    If you want the image to appear on the same "row" as your other details, you can use Section Export on the section above it and check the "Underlay Following Sections" option but beware that if you have multiple sections beneath it, you may have to handle this appropriately.

    This approach is 100% reliant on the fact that if the ImageFile is not null and not blank, then the file MUST exist otherwise the section will still be displayed and waste space.  If this is an issue, you will need to use a third party UFL to check if the file exists and suppress the section if it doesn't.