

RF warehousing is a North American add-on and it’s controlled by the activity code XA16. When you purchase the XA01 ADC license, it includes the RF Warehousing as well.
It has two functions, Directed putaway and Directed picking.
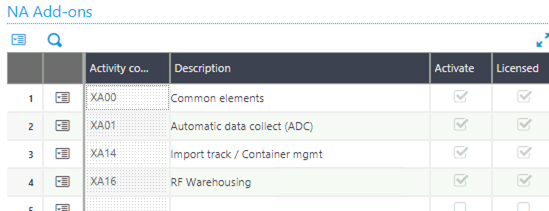
You can check the availability of an NA Add-on license under Development, NA Utilities, Add-on license inquiry.
Note; Serial number management is not supported in both functions.
Advantages:
Directed picking is used to maximize shipment picking process and in turn maximize warehouse staff efficiency.
Directed putaway management will suggest a list of locations to store the product based on the priority rules setup on the ADC parameters locations are found.
Setup – Directed picking.
1. Locations: Prior to implementing the directed picking process an analysis must be done of all warehouse locations to determine what grouping (zone) they should fall within.
2. Then assign a zone for each location.
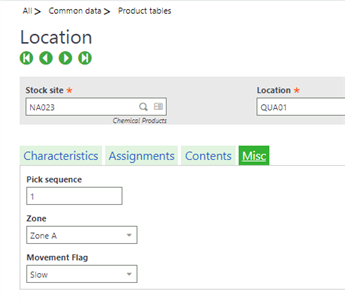
3. In GESLOC Common Data, Product tables, Locations select the Misc. tab;
4. Assign a zone – available selections are Zone A to Zone H.
- Pick sequence – to determine the order for picks throughout all zones. This field is alphanumeric. You can use 0 – 9 then A – Z then a – z values.
- Movement flag – this flag indicates if the location is a fast- or slow-moving location. This flag only comes into play when empty locations are selected.
- Note: if a dedicated location is setup as slow and the product is setup as fast, this flag is ignored.
This flag is also available on the product-sites record misc. tab, indicates if the product is a fast- or slow-moving product in the site.
This flag comes into play when empty locations are being selected.
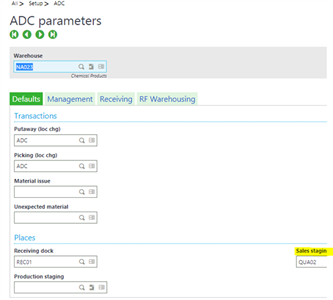
5. In Setup, ADC, ADC parameters, Defaults tab, assign a sales staging location.
Below is the setup of the Directed putaway.
(this is a different function under ADCs, Purchasing, Directed putaway).
To setup this functionality;
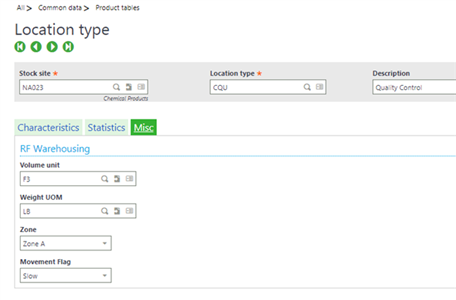
1. Setup the location types in Common data, Product tables, Location types Misc. tab, RF Warehousing tab;
- Enter a volume unit – UOM for the location volume
- Enter a weight UOM – UOM for the location weight
- Zone – Zones in the warehouse A- Z
- Movement flag – Indicates if a location is fast- or slow-moving location.
Note: first two values, i.e. the UOM values are used for bin space check portion of directed putaway.
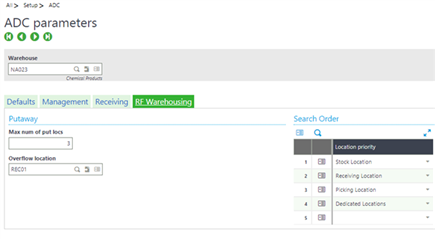
2. Configure the ADC parameters in Setup, ADC, ADC parameters, RF warehousing tab – Putaway grid.
- Enter the Max num of put locs – greater than zero. Controls how many locations may be suggested.
- Overflow location – the default “catch all” location suggested if no other locations are found.
- Select the location priority under the Search Order grid – order in which the locations will be searched. The search order is sequential.
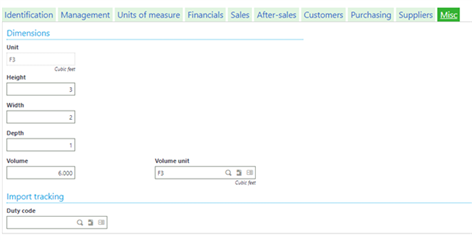
3. Under Products record GESITM, Misc. tab you can define the;
height, width, and depth to calculate the volume.
These fields will serve the directed putaway function by restricting the quantity directed to a location based on the available volume remaining in a location vs total volume of the product to be putaway.
Functional side of the directed picking;
1) Work assignment: Sales, Directed picking, Work assignment
- In work assignment function, generate a batch against a shipment.
- Assign one or more users to a batch. Only 4 users to a batch can be assigned.
- Assign specific zone range to each user.
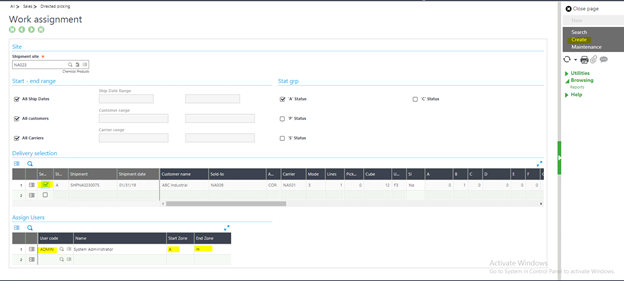
Note: In work assignment selection, stat grp grid, there are four shipment statuses.
A – shipment not yet assigned to a batch.
P – in picking, assigned to a batch but not picked.
S – Picking completed but shipment not validated.
C – picking completed, and shipment validated.
- Only shipments with an A status will be selected.
2. Batch maintenance: Sales, Directed picking, WA batch maintenance
- After generating a batch, it can be viewed and modified by the work assignment batch maintenance function (if necessary).
- Delete an entire batch.
- Modify the users assigned to a batch.
- Modify the zone ranges assigned to the users of a batch.
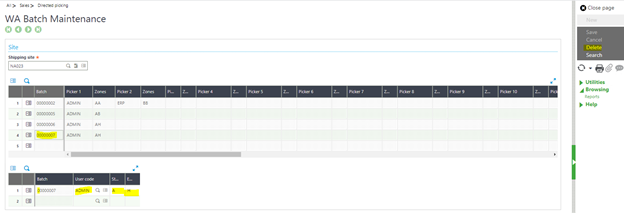
- Only the batch status of ‘P’ will be considered active.
- Once the batch is picked it will be considered inactive.
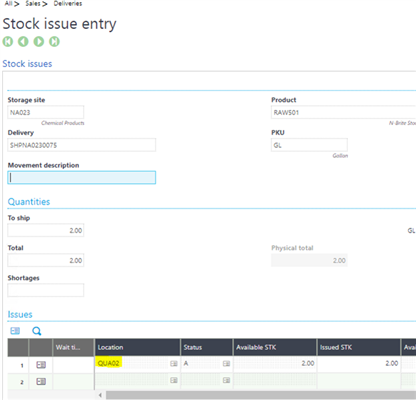
3. Once the batch is generated, we can pick the delivery using the XADP function in ADCs, Sales, Directed picking;
- In the summary tab, it summarizes the information from the first batch assigned to the user.
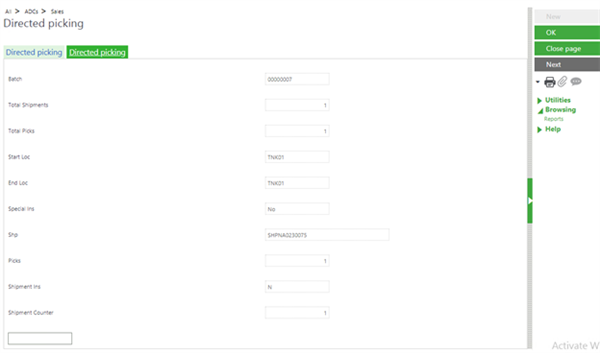
- Additional shipments within the shipment batch can be viewed by selecting the ‘Next’ button.
- Following fields are displayed;
Batch, Total shipments, Total picks, Start Loc, End Loc, Special Ins, Shp, Picks, Shipments Ins, Shipment counter.
- Once the shipment is selected select the ‘OK’ button to enter the individual pick lines (first tab).
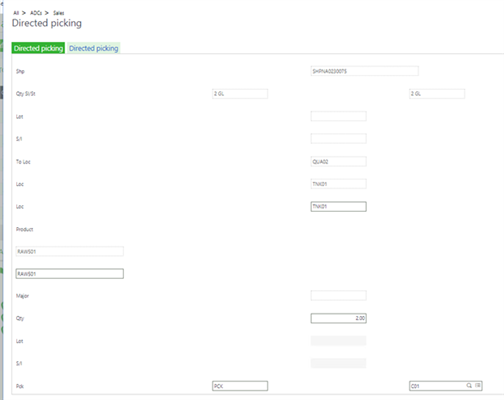
- Enter the following field values; Loc., Product, Qty, Pck. (packaging assignment from packages table) and packing size.
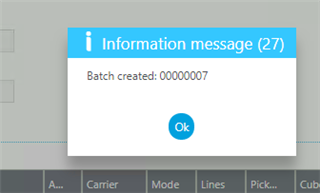
- Once the delivery is fully picked, will get a message “Picks complete for batch”.
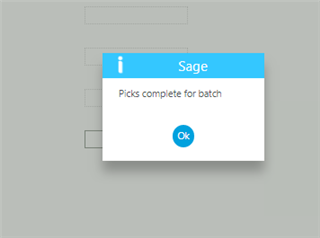
- Then "No open picks"

- Batch status will be ‘S’ in Work assignment.

- Stock is moved to the staging location.
Note, when there are two different batches containing various shipments, you must complete the first batch prior to going to the second batch.
For example:
Batch 00001 has zones A – H
Batch 00002 has zones A – H
You must complete the picking of batch 00001 prior to moving to batch 00002.
In case that is not possible, you can change the zones on Batch 00002 = A – C and Batch 0001 = D – H (provided the inventory is available in those locations).
If that’s not the case, then you need to delete the batch 00001 and generate a new batch 00003 to pick batch ‘00002’.