First things first. PlannerOne and Production Scheduler are NOT the same thing but they do go hand in hand. Production Scheduler is the Sage X3 option for planning and scheduling. PlannerOne Manager is where you can view the statuses of the Production Scheduler component, manage the data connection between PlannerOne and Sage X3, initialize or delete Sage X3 production sites, manage schedules and so on.
I'm sure you have many questions about PlannerOne and Production Scheduler, but in this post, we are only going to discuss PlannerOne and how to get it setup correctly. Other posts will follow on troubleshooting PlannerOne and Production Scheduler.
Before we open PlannerOne Manger, there are several things to review.
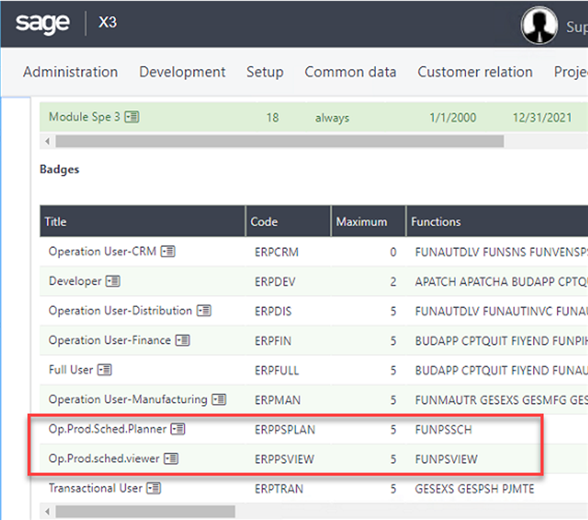
We need to verify you have a license for Production Scheduler. In Sage X3, go to Administration, Administration, Licenses, License data then click on the Product link. Scroll down to Badges. You must have a couple ERPPSPLAN badges, 1 is used by the account logged into PlannerOne. ERPPSVIEW badges are only needed if you want someone to use Production Scheduler Viewer.
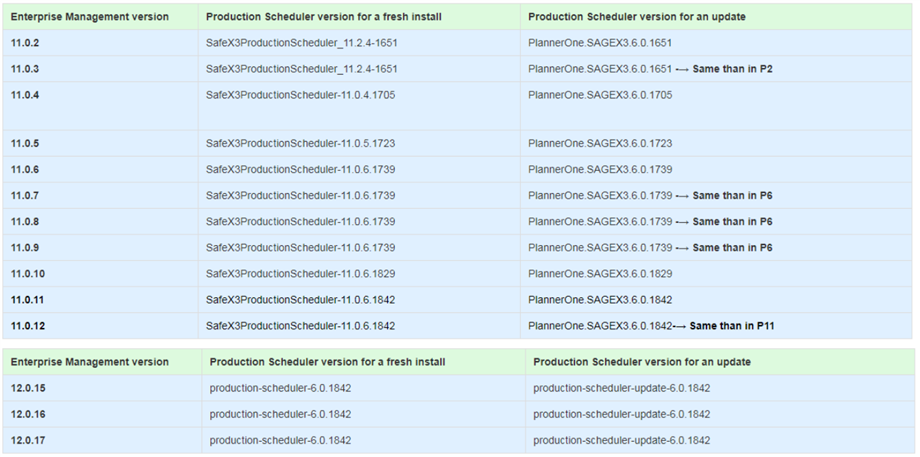
We need to verify that you have the correct version of PlannerOne. The version you install is specific to your version of Sage X3. The list, like below, can be found in the Sage Knowledgebase in KB #92492 - The Compatibility Production Scheduler list with X3. Although, the version hasn't changed from PlannerOne.SAGEX3.6.0.1842 since V11P11.
We should also look at your Syracuse version. A lot of changes have been made in the more recent versions of Syracuse that greatly benefit PlannerOne and Production Scheduler. If possible, install the newest version of Syracuse. If you need help finding out what version of Syracuse you have, check out this blog post. https://www.sagecity.com/support_communities/sage_erp_x3/b/sageerp_x3_product_support_blog/posts/uhh-i-don-t-know-that-what-version-of-sage-x3-do-you-have
OK, now let's open PlannerOne. The link to open PlannerOne is specific to the folder or "tenant". If you have 2 tenants setup with Production Scheduler, you will have two different executables to open PlannerOne. This is normally found in C:\Program Files\PlannerOne\<foldername> and it is called PlannerOneManager.exe.
If you have more than one tenant set up, verify you are using the right PlannerOne exe. You will see the tenant name like below. This one is setup for the SEED folder.

Now to the good stuff. All those green checkmarks are what you want to see. This tells us that PlannerOne is configured correctly. Let's take a look inside.
We will start with the Configuration Manager tab. If you are just getting the system set up, there are only a couple things to review on the left list, the REST Adapter and Tenants. The REST Adapter is where the connection is made.
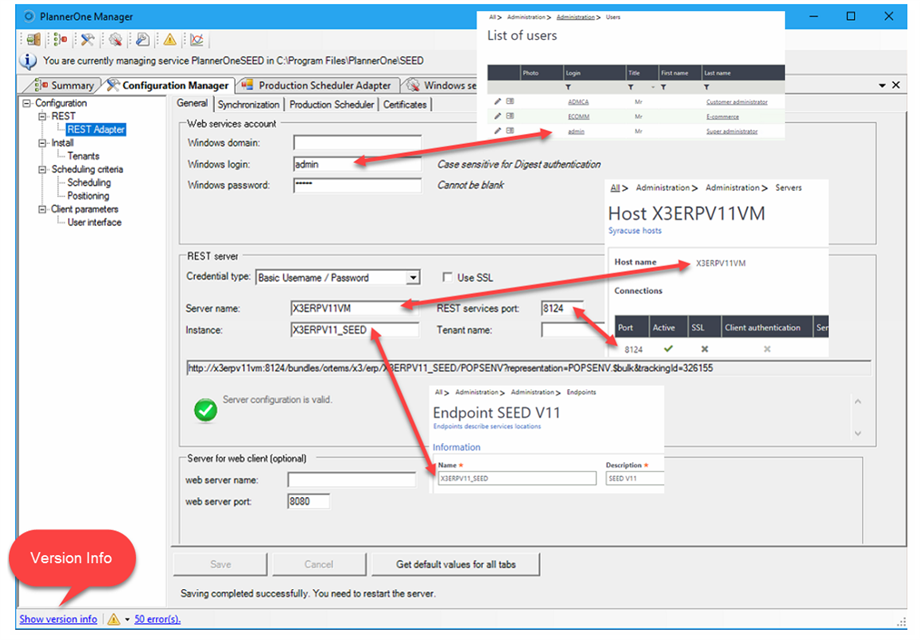
If any one of these settings are incorrect, PlannerOne will not work. As you can see in the screenshot above, each value is related to Sage X3. You can also see the PlannerOne version by using the link in the bottom left corner.
The user must be a user from Administration, Users, Users. It does not have to be the admin user or use the ERPDEV badge but it does need the ERPPSPLAN badge.
There are only a couple things to note from the Tenants page, Web Application Name and Web Site Port. You will need these when you create the Connected application in Sage X3.

Now let's move on to the Production Scheduler Adapter. This is where you will initialize a site to use in Production Scheduler. All you have to do is highlight the site and click on Init environment from ERP at the bottom. You can initialize multiple sites at one time by clicking on each site to highlight it and then initialize. Just remember, the more sites you initialize the more taxing it is on your system so only initialize if you need it. If there is one initialized that you don't want, just click on Delete environment in PlannerOne. Don't worry, it's not going to delete the site. It's just going to remove it from the list inside of Production Scheduler.

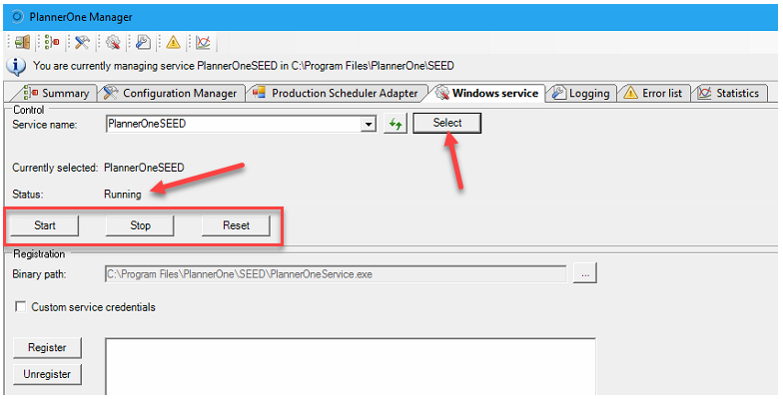
The Windows service tab allows you to manage the PlannerOne service. Choose the tenant and click on Select. You will see the status of the service. You can start, stop and restart the service from here.
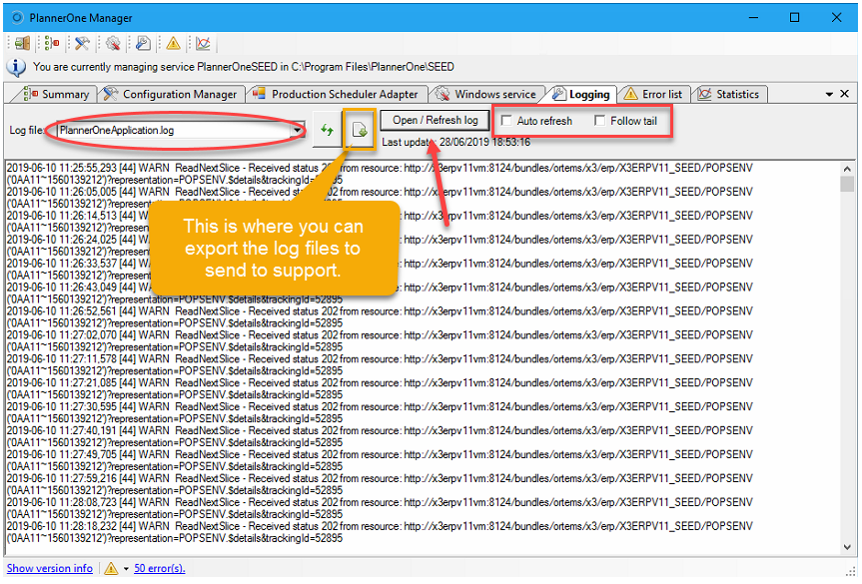
The last two tabs we are going to talk about work together, Logging and Error list. Error list will show you anything that is listed as an error (even though it may not really be an error). This is a good place to start if you are trying to troubleshoot.

The Logging tab is where you will find the most information to troubleshoot. So let's go over it.
The Log file you want to look at is PlannerOneApplication.log and that should be what is in that field by default. Once you verify that, click on Open / Refresh log. The newest information is always at the bottom. If you are trying to watch the logs while testing, check the Auto refresh and Follow tail check boxes. Those should be self-explanatory but just in case, Auto refresh will update the screen when something is posted to the log and Follow tail will keep you at the bottom of the file so you don't have to keep scrolling down.
So, that is PlannerOne Manager. I know this has been a long post and as a reward for those of you who have made it all the way to the bottom, here is a quick troubleshooting nugget. You can put the log file in debug mode to get even more information. But don't forget to change it back to info mode when you are done troubleshooting.
In PowerShell (run as administrator):
Navigate to the install location of PlannerOne on the server. (e.g. C:\Sage\Planner_one_for_Sage_X3\SAGE.6.0.1842\module)
- Enter ./init.ps1 and a list of commands will be displayed
- To check the log level enter this command: get-p1loglevel -tenant SEED
- To change the log level to debug enter this command: set-p1loglevel -tenant SEED -level DEBUG
Tune in to my next post and we will discuss the settings needed inside Sage X3 to connect PlannerOne and Production Scheduler.

