

In a previous article "Customizing campaigns and marketing features" I discussed how amongst the powerful features that Sage CRM provides are marketing automation functions which offer the ability to control campaigns, waves (phases) and wave items( activities).
Running a campaign can touch on multiple areas of functionality in the system, extending beyond the campaign tabs that you access from the marketing button in the main menu. The marketing features are automated using workflow that controls the actions available within the Campaign, Wave and WaveItem screens.
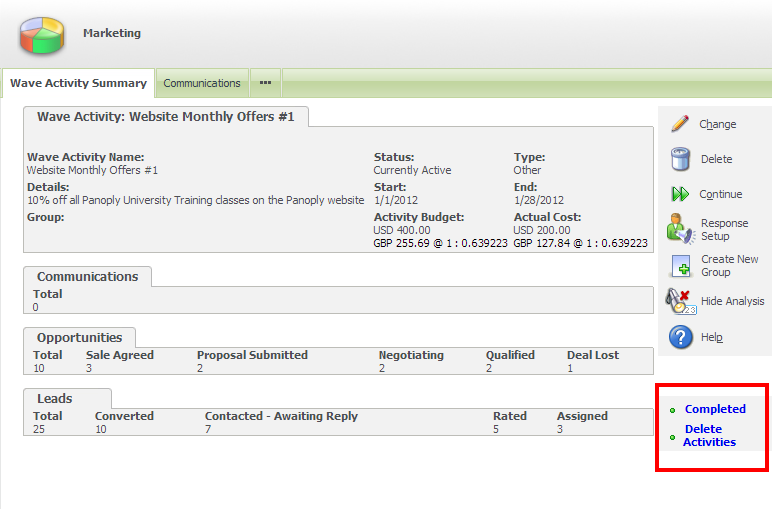
You can see from the image above that a type of Workflow is used to provide the automation of the wave item and the same is true for campaigns and the waves. The default workflow for each of the marketing entities steers the user through the predefined business processes but the key point is that this workflow is uneditable.
If you wish to edit the workflow then you need to enable the Graphical Workflow features.
Administration -> Advanced Customisation -> Workflow & Escalation Configuration

Note: This will only turn on the graphical workflow for campaigns, waves and wave items created after you enable the Graphical Workflow. All existing campaigns, waves and wave items will continue to use the fixed default workflow processes.
The marketing tables campaigns, waves and wave items can now have their workflows customized.
Administration -> Advanced Customisation -> Workflow

- Sage Campaigns Workflow
- Sage Wave Workflow
- Sage WaveItem Workflow
Each of these workflows can be customized and extended like any other graphical workflow within Sage CRM.
Brand new marketing workflows can also be created that include all the standard workflow rule types, primary, transitional, global, conditional and escalation rules.
The workflow actions that are grouped as Campaign Actions within the new workflow rule screens are designed for use on the WaveItems table as these are very much marketing-related activities.

Brand new activities can be created using the .NET or classic ASP APIs.
This would be done within the WaveItems Workflow.
There are a few tasks that need to be done in order to add a new custom action into the WaveItems workflow.
Step 1
Create a new wait_type option within the waveitems table.
Administration -> Customisation -> Wave Activities

This will allow the user to pick the Custom Action when creating a new Wave Item (activity).

Step 2
The new Wave Item workflow needs to have a new workflow action added.

This action can be defined to call a .NET assembly or an ASP page.
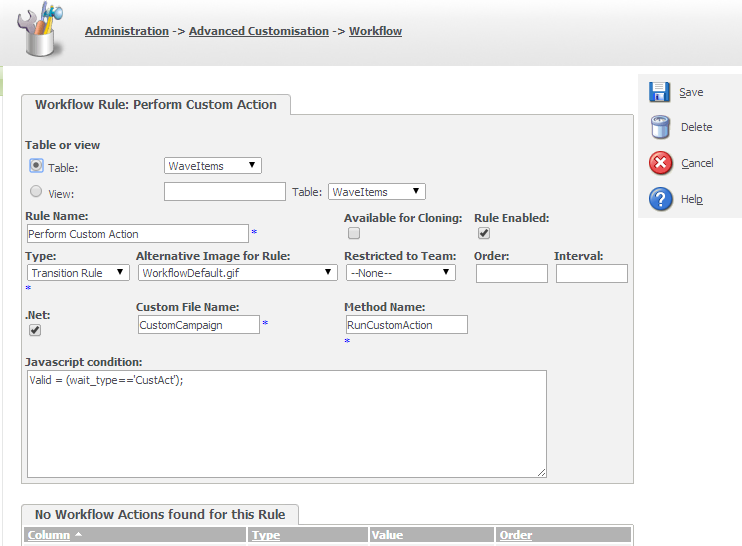
The javascript condition is used to ensure that the workflow button that calls the custom rule will display only when the Wave Item type (wait_type) has been selected by the user to be the new 'Custom Action' option.
Calling a custom page within the marketing workflows is just like calling a custom page or .NET assembly in any other workflow. There are a number of article that discuss adding custom actions to workflows but a good starting point is "Using ASP Pages in Workflow".
Note: You can not mix ASP pages or .NET assemblies with standard workflow actions within the same rule.
