
If you are interested in using X3's ZPL Printer feature to produce documents, such as Labels, which have embedded barcodes, then there are several Knowledgebase Articles which discuss aspects of ZPL Configuration - these can be found on the Knowledgebase Site.
Knowledge Base Article 18688 includes a link to a document called Sage ERP X3 ZPL Setup.pdf which provides more in-depth information on the subject.
This blog provides additional advice to help you with setting up Patterns to use with X3.
X3 Zebra Printing uses a ZPL (Zebra Programming Language) Pattern file to determine the layout of the output and what information is output - the information can be
- Barcodes based on X3 Data
- X3 Field Data (X3F_ fields)
- The results of Formulae based on X3 Data (X3E_ fields)
- Plain, static text
Sage assumes that the Consultant creating the ZPL Pattern is familiar with the features provided by the Language.
Creating a ZPL Pattern Definition in X3
ZPL Pattern Definitions are imported into X3 as part of the ZPL Report set up in Development > Script Dictionary > ZPL Reports function.
Prior to importing a ZPL Pattern from a .PAT text-file, the .PAT file must be placed in the Folder's PAT sub-directory, for example "...\Folders\SEED\PAT" when using the SEED Folder.
To import the contents of the .PAT file, click on the File template's Actions icon and select "New version of model" - the Version number will be displayed and the internal counter will be incremented so the next import will have a distinct Version Number.
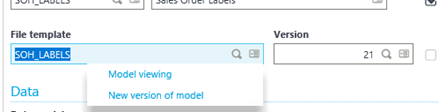
Please note that the Pattern will not be used until the ZPL Definition has been Saved, so make a small change to the Description such as adding a space so that the Save action is available - if an earlier Version exists, that will be used instead.
The runtime selection criteria set up in Report Parameters, as described later, are used to select the data to be included in the Report
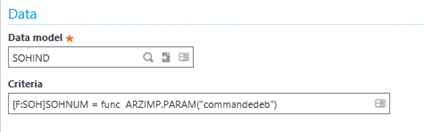
In the above case, ARZIMP.PARAM("commandedeb") function provides a link the the value specified in that Parameter at run-time - in this case, as defined in Report Parameters within Dictionary > Script dictionary > Reports
ZPL Patterns have three main sections, Header, Detail/Line and Footer/Tail, and each section is marked using ^XA and ^XZ lines:

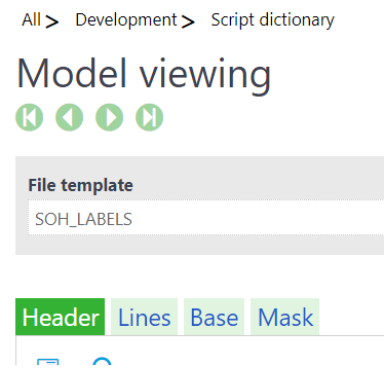
Please check that the .PAT has been imported correctly:
Click the Action icon of the Template file field and select "Model Viewing" action
Check that Header, Lines and Base have ZPL commands in them - if all three tabs are not populated, this implies that the sections are not defined properly and should be reviewed.
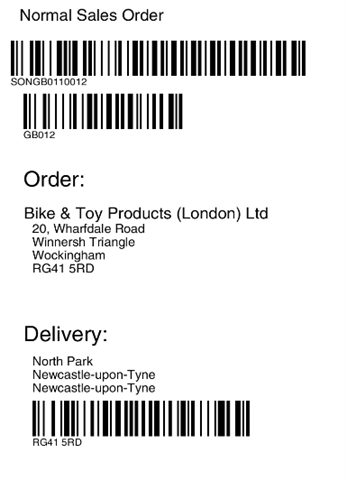
The following example shows a Label Pattern with X3E_ and X3F_ fields and the output for a particular Sales Order before it is sent to the Printer
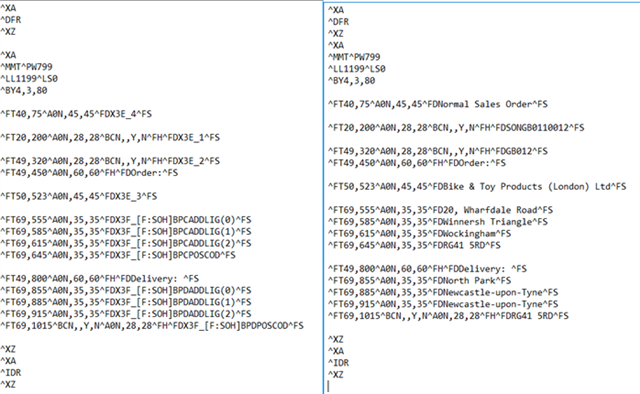
This ZPL Printer definition has the following Expressions which correspond to the X3E_ fields
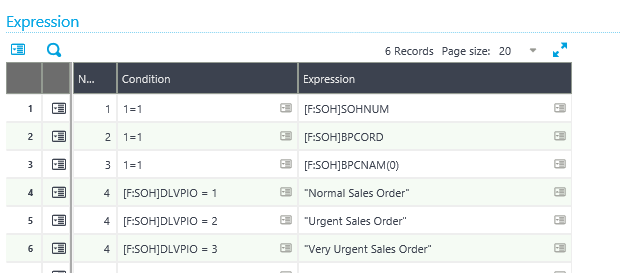
The three lines for Number "4" make it possible to have different values substituted for X3E_4 at runtime depending on which condition is satisfied.
When a ZPL Printer report is run, the results are output in text form to a DATA file which is then submitted to the Zebra Printer.
The above example will be printed as
Creating a ZPL Report
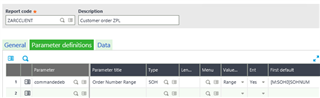
After setting up the ZPL Printer to hold the ZPL Pattern, an X3 Report should be set up to run the ZPL Printer Report. This is done in Development > Script Dictionary > Reports.
This is where the ZPL Printer is associated with an X3 Report, the ZPLPRINTER Destination and Report Parameters which select the data to be output.
On ticking the "ZPL printer" field, the "Parameter Code" field becomes active and this is where the ZPL Printer's Code is entered.
Specify the Zebra Printer's Code in the "Destination" field.

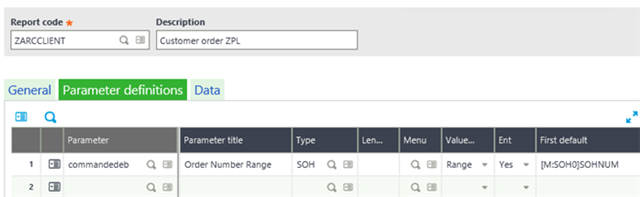
On the Parameter definitions tab, specify the parameters which will be used by the ZPL Printer.
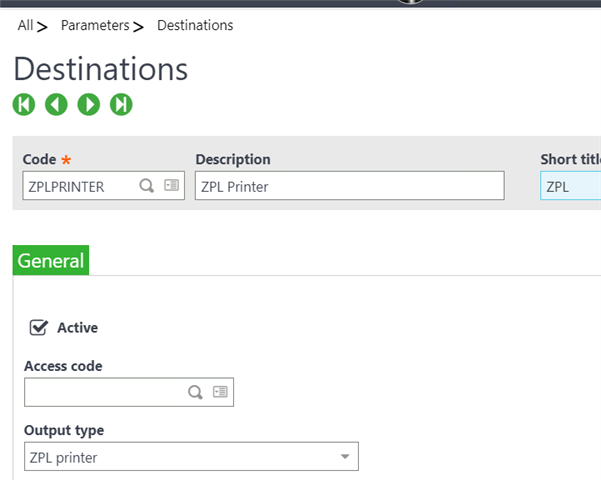
Creating a ZPL Destination
In addition to setting up a ZPL Pattern Definition and a ZPL Report, a ZPL Destination should be set up to define which printer to output to - this must be of Output Type "ZPL Printer".
The Destination is set up in Parameters > Destinations > Destinations
Please note that there is an issue with this option - the Printer field value must be the fully qualified domain-name value rather than just the Windows Printer, e.g. \\warehouse\labelprinter rather than the Printer name labelprinter.
In order to work around this, please update the Destination via SQL - for example
update SEED.APRINTER
set PRTNAM_0='\\warehouse\'+PRTNAM_0
where COD_0='ZPLPRINTER'
Associate a ZPL Report with an X3 Function
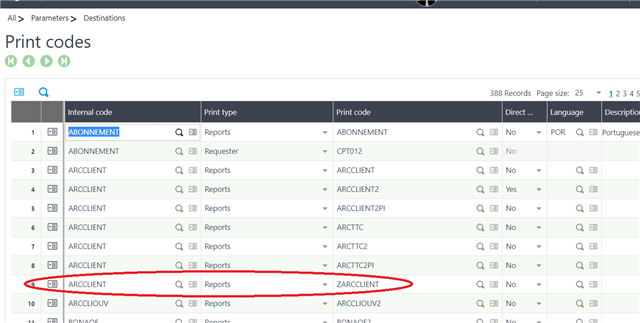
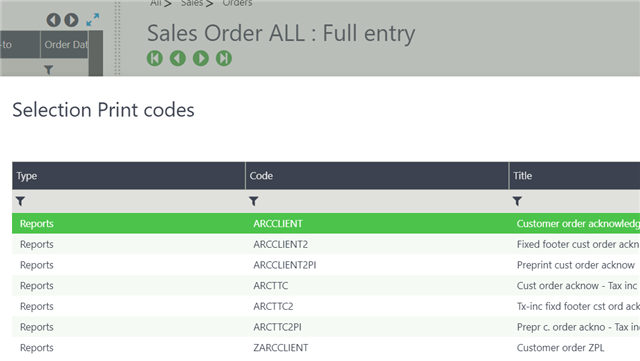
After creating the Pattern and Report Codes for the ZPL Report, associate the Report Code with a Function in Parameters > Destinations > Print Codes
In this case, the Report Code ZARCCLIENT is associated with the SOH_LABELS ZPL Pattern and this will be available as a Record Report within Sales Orders Function.
Output from a ZPL Report
The ZPL Report generates a ZPL text file with the naming convention <report-name>_<sequence-number>_<timestamp>.DATA in the Folder's PAT sub-directory. This file is then sent to the Zebra Printer which interprets the ZPL tags to produce the final output.
Testing ZPL Patterns
You may wish to validate the ZPL Pattern files and .DATA files by visiting a third-party site such as http://labelary.com/viewer.html - these are not affiliated with Sage and are used at your own risk.
I hope this article is of assistance.
